Tying a fishing hook may seem simple, but the strength and reliability of your knot can make or break your fishing trip—literally. Whether you’re trying to land your first catch or you’re a seasoned angler fine-tuning your rig, mastering the right knot is essential. Different knots offer different benefits—some are great for strength, others for quick tying, and some are ideal for specific line types like monofilament or braid.
In this step-by-step guide, you’ll learn how to tie the most popular and effective fishing hook knots, with clear instructions and expert tips to help you do it right the first time. Let’s dive in and make sure your hook stays where it belongs—secure and ready to catch fish.
Why Tying a Fishing Hook Correctly Matters
Tying your hook properly isn’t just a beginner’s lesson—it’s the foundation of successful fishing. A weak or sloppy knot can cause your hook to slip off or your line to break, resulting in lost catches and wasted effort.
Preventing Lost Fish
A strong knot ensures that the hook stays attached during a fight, especially when targeting larger or more aggressive fish.
Avoiding Line Breakage
Poorly tied knots can create stress points that weaken the line. A clean, secure knot helps distribute tension more evenly.
Enhancing Bait Presentation
The right knot helps present your bait or lure more naturally, increasing your chances of getting a bite.
Tools and Materials You’ll Need
Before you begin tying, make sure you have the right tools and materials ready. These can make the process smoother and help you tie cleaner, stronger knots.
Fishing Line Types
- Monofilament – Flexible and easy to knot, great for beginners.
- Fluorocarbon – Less visible underwater, stiffer than mono.
- Braided Line – Very strong and thin, but requires specific knots.
Types of Fishing Hooks
- Baitholder Hooks – Great for live bait, with barbs on the shank.
- Circle Hooks – Designed to hook fish in the corner of the mouth.
- Treble Hooks – Three-pronged, often used with lures.
Optional Tools
- Line clippers or scissors
- Needle-nose pliers
- Knot-tying tool (especially helpful for beginners or cold hands)
5 Popular Fishing Knots for Tying Hooks
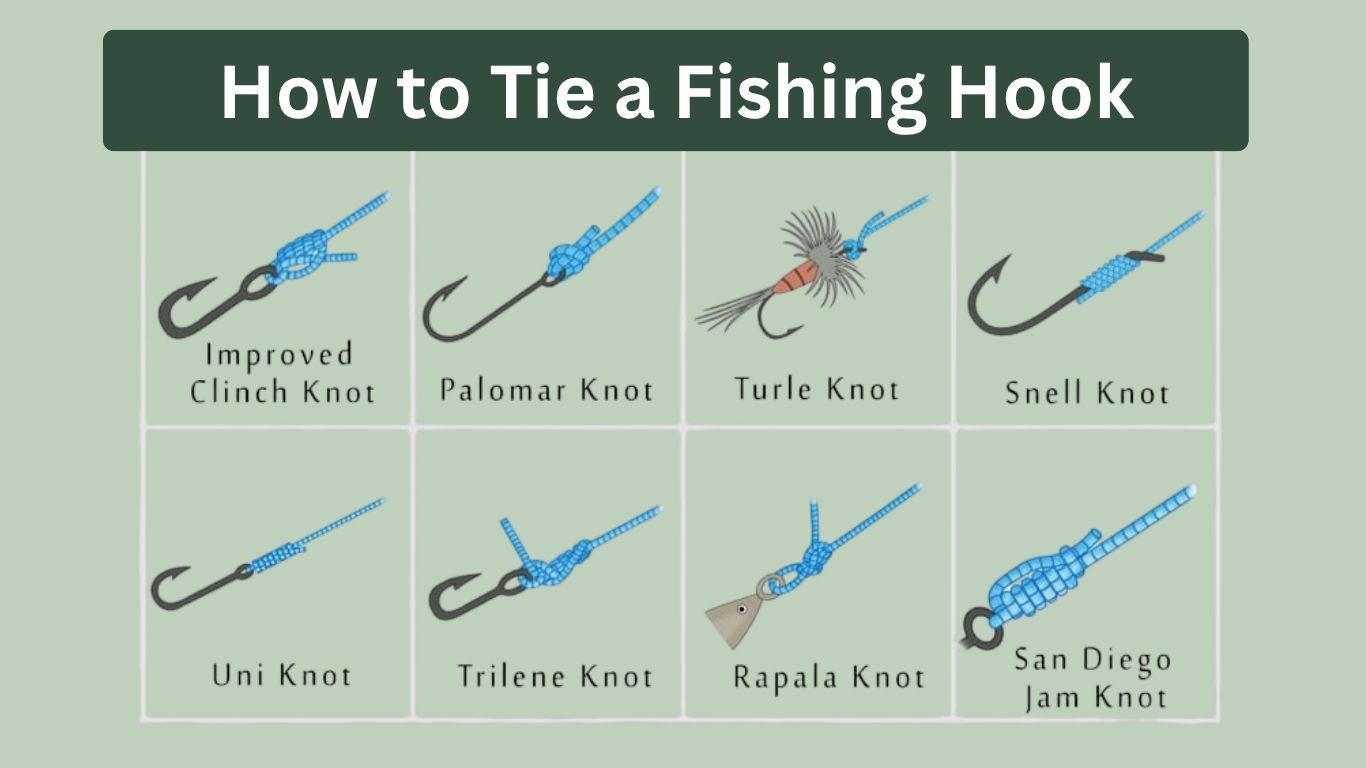
These are the most commonly used knots that cover a wide range of fishing styles and conditions. Each has its own strengths, and you’ll learn how to tie them in the sections below.
- Improved Clinch Knot – A go-to knot for most freshwater fishing.
- Palomar Knot – Simple and extremely strong, especially for braided lines.
- Uni Knot – Versatile and works well with different line types.
- Snell Knot – Ideal for bait hooks and maximizing hook strength.
- Loop Knot – Keeps lures or bait moving naturally in the water.
How to Tie an Improved Clinch Knot
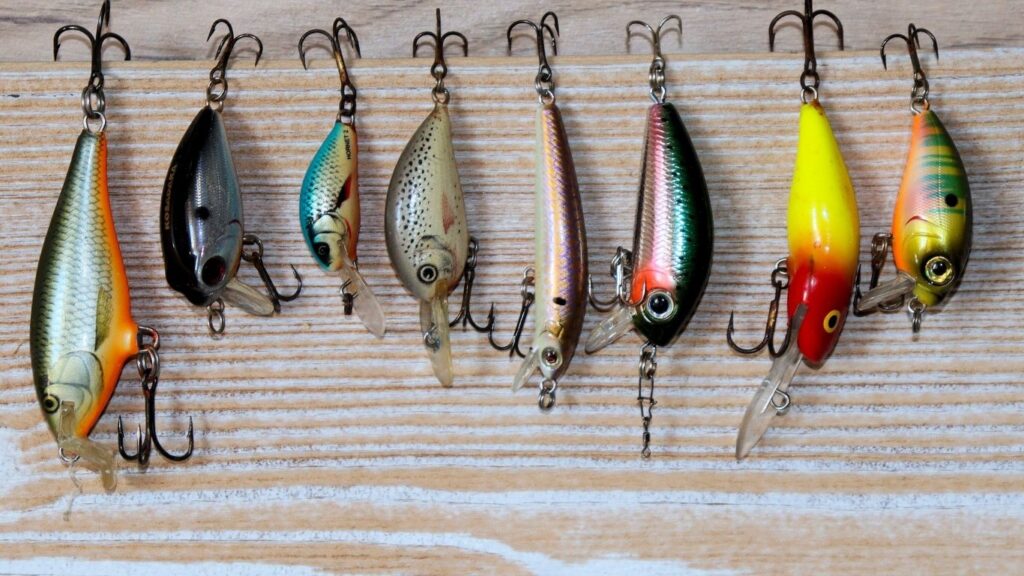
The Improved Clinch Knot is a favorite among anglers for securing a hook to monofilament or fluorocarbon line. It’s simple, reliable, and ideal for small to medium-sized fish.
Step-by-Step Instructions:
- Thread the line through the eye of the hook.
- Wrap the tag end around the standing line 5–7 times.
- Pass the tag end through the small loop just above the hook eye.
- Then, pass it again through the large loop you just created.
- Moisten the knot with water or saliva.
- Slowly pull the standing line to tighten.
- Trim the excess tag end.
Best Uses for This Knot:
- Works great with monofilament and fluorocarbon lines.
- Ideal for beginners and light tackle fishing.
- Commonly used for tying hooks, swivels, and lures.
Tips to Avoid Slippage:
- Always wet the knot before tightening.
- Make sure wraps don’t overlap or cross.
- Test the knot strength with a firm tug before casting.
How to Tie a Palomar Knot
The Palomar Knot is known for its high strength and is especially effective with braided lines. It’s quick to tie and extremely secure.
Step-by-Step Instructions:
- Double about 6 inches of line and pass it through the hook eye.
- Tie a loose overhand knot in the doubled line.
- Pass the loop over the hook.
- Pull on both the standing line and tag end to tighten.
- Moisten before tightening fully.
- Trim the tag end.
Strength and Benefits:
- One of the strongest fishing knots.
- Holds well even with slippery braided lines.
- Maintains almost full line strength.
Common Mistakes:
- Don’t let the loop twist when passing it over the hook.
- Be sure to tighten the knot slowly and evenly.
How to Tie a Uni Knot
Also known as the Duncan Loop, the Uni Knot is very versatile—it can tie a hook, connect lines, or create loops. It works with all line types.
Step-by-Step Instructions:
- Run the line through the hook eye and double it back 6 inches.
- Form a loop over the doubled section.
- Wrap the tag end around both lines and through the loop 5–6 times.
- Pull the tag end to tighten the wraps.
- Slide the knot down to the hook.
- Moisten and tighten.
Versatility of the Knot:
- Works on hooks, lures, swivels, and even joining two lines.
- Strong and easy to tie under pressure.
- Adjustable before tightening.
When to Use It:
- Perfect for fluorocarbon or monofilament.
- Common in both saltwater and freshwater fishing.
How to Tie a Snell Knot
The Snell Knot is designed for hooks with a turned-up or down eye and is best for bait fishing. It keeps the line aligned with the hook shank, improving hook-up rates.
Step-by-Step Instructions:
- Thread the line through the hook eye from the front.
- Lay the tag end along the hook shank.
- Wrap the line around the shank and tag end 7–8 times.
- Hold the wraps tight and pull the mainline to secure.
- Trim the excess.
Best for Bait Hooks:
- Maintains hook alignment for better penetration.
- Popular for live bait rigs and bottom fishing.
Snell Knot Variations:
- Traditional Snell: Manual wrap control.
- Easy Snell: Uses a tool or simpler wrapping.
How to Tie a Loop Knot (Non-Slip Loop)
The Loop Knot allows lures or bait to move freely in the water, making it ideal for topwater and jerkbait presentations.
Step-by-Step Instructions:
- Make an overhand knot about 10 inches above the hook.
- Pass the tag end through the hook eye.
- Return the tag end through the overhand knot.
- Wrap it around the standing line 4–5 times.
- Pass the tag end back through the overhand knot.
- Moisten and tighten by pulling both ends.
- Trim the tag.
Perfect for Lures or Live Bait:
- Allows natural movement for increased strikes.
- Common for bass, trout, and inshore saltwater fishing.
When to Avoid It:
- Not ideal for heavy cover or strong current conditions.
- Avoid using with thick braided lines.
Tips for Beginners to Practice Knot Tying
Learning to tie knots takes patience and repetition. These simple tips will help beginners gain confidence and consistency, even before hitting the water.
Use Thicker Line First
Start practicing with thicker fishing line (or even string or paracord) to clearly see how the knot forms. This helps you understand the structure before moving to thinner lines.
Practice with Larger Hooks
Larger hooks are easier to grip and see, making it easier to loop and tighten knots correctly without fumbling.
Wetting the Knot Before Tightening
Always moisten the knot with water or saliva. This reduces friction and prevents line damage, helping the knot cinch down tightly and smoothly.
Test the Knot Strength
After tying, pull hard on the standing line and hook to test the knot. If it slips or breaks, check for overlaps or missed wraps, then retie.
How to Choose the Right Knot for Your Fishing Situation
Not all fishing knots are ideal for every condition. Choosing the correct knot depends on your gear, target species, and water type.
Freshwater vs. Saltwater
- Freshwater: Improved Clinch and Uni knots are often enough.
- Saltwater: Use stronger knots like the Palomar or Snell to withstand hard runs and abrasion.
Light Tackle vs. Heavy Gear
- Light tackle: Prioritize easy-to-tie knots that maintain flexibility, like Uni and Loop knots.
- Heavy gear: Stronger knots like Palomar or Snell are preferred for handling bigger fish.
Live Bait vs. Artificial Lures
- Live bait: Snell or Loop knots allow natural movement.
- Lures: Loop knots add realistic lure action, while Clinch knots keep it tight and compact.
Common Mistakes to Avoid When Tying Hooks
Avoiding a few key errors can dramatically increase your knot strength and catch rate.
Rushing the Process
Tying in a hurry leads to poor structure and incomplete wraps. Take your time, especially when learning.
Using the Wrong Knot for Line Type
Each line type behaves differently. For example, braided lines can slip with basic knots—Palomar or Uni are more reliable for them.
Not Testing the Knot
Casting a poorly tied knot risks losing your hook—and the fish. Always give your knot a firm tug before use.
FAQs
Many anglers—especially beginners—have common questions when it comes to tying fishing hooks. Here are answers to the most frequently asked:
Which Knot Is Easiest for Beginners?
The Improved Clinch Knot is often recommended for beginners. It’s simple, quick to learn, and effective with monofilament lines.
What Is the Strongest Fishing Knot?
The Palomar Knot is considered one of the strongest all-purpose knots, particularly for braided lines. It retains most of the line’s original strength.
Can I Use the Same Knot for All Types of Hooks?
Not always. While some knots like the Uni or Palomar are versatile, others (like the Snell Knot) are best for specific hook styles such as offset-eye bait hooks.
Should I Trim the Excess Line After Tying?
Yes. Always trim the tag end to about 1/8 inch after tightening the knot. Too much excess can spook fish or get tangled; too little can risk slippage.
Do Braided Lines Need Special Knots?
Yes. Braided lines are slick and need knots like the Palomar or Double Uni Knot to hold securely without slipping.